Building Self-Service Web Pages in Contentful with GatsbyJS
Using the Contentful CMS, learn how to create a pattern on your website that allows content editors to create web pages with minimal development work.
.jpeg)

Contentful can provide a great experience for your content editors. However, editors are often limited to simple text updates or switching out images, and creating brand new pages on your site can take a lot of development time.
In this article, we'll outline the steps to build more modular content with Contentful, a pattern we’ve called “self-service pages”.
_The examples contained were built using Contentful + Gatsby, but these concepts could be applied to any CMS/front-end framework pairing._
## Context - power and simplicity together
One of Headway's clients wanted the freedom of a dev-built page, but with the speed of simple content management. We had to create a solution to enable them to create new pages with little to no effort from a web developer.
We ended up with a self-service model of page creation using individual, reusable components.
### Decision time
There are a lot of free-form, no-code website builders out there that allow content editors to do **\***anything**\*** they want, and entirely abstracts away the building of the actual components. While this is a good approach for some, it can lead to decision fatigue and a lack of brand consistency throughout a project.
The self-service page model allows for greater choice while still relying on components and constraints that developers and designers work together to create. This is a really good solution for non-technical content editors or pure copywriters who don't need to be making tons of design and layout decisions.
If this is a good compromise for you, read on!
## Step 1: Plan your content models
Before you start building your self-service page, it's essential to plan out the content models you will need. The difficult (or fun) part is looking at your website, or the designs for your website, and deciding which sections you want to make into reusable components.
In Contentful, a content model defines the structure and organization of your content; from a simple button to complex page layouts. In this case, you'll need to identify the content types you want your self-service pages to be built from and what fields they will have. Some obvious examples would be a hero at the top of the page or a call to action banner at the bottom of an information page.
These are pretty common to most pages, though, so the real value comes from any section that makes up the middle parts of your page. This could be a carousel of customer testimonials or a 2x2 grid of content with icons, subtitles, body text, and a heading for the whole section. If they're not created already, build them like any other Contentful type.
## Step 2: Create the self-service page model
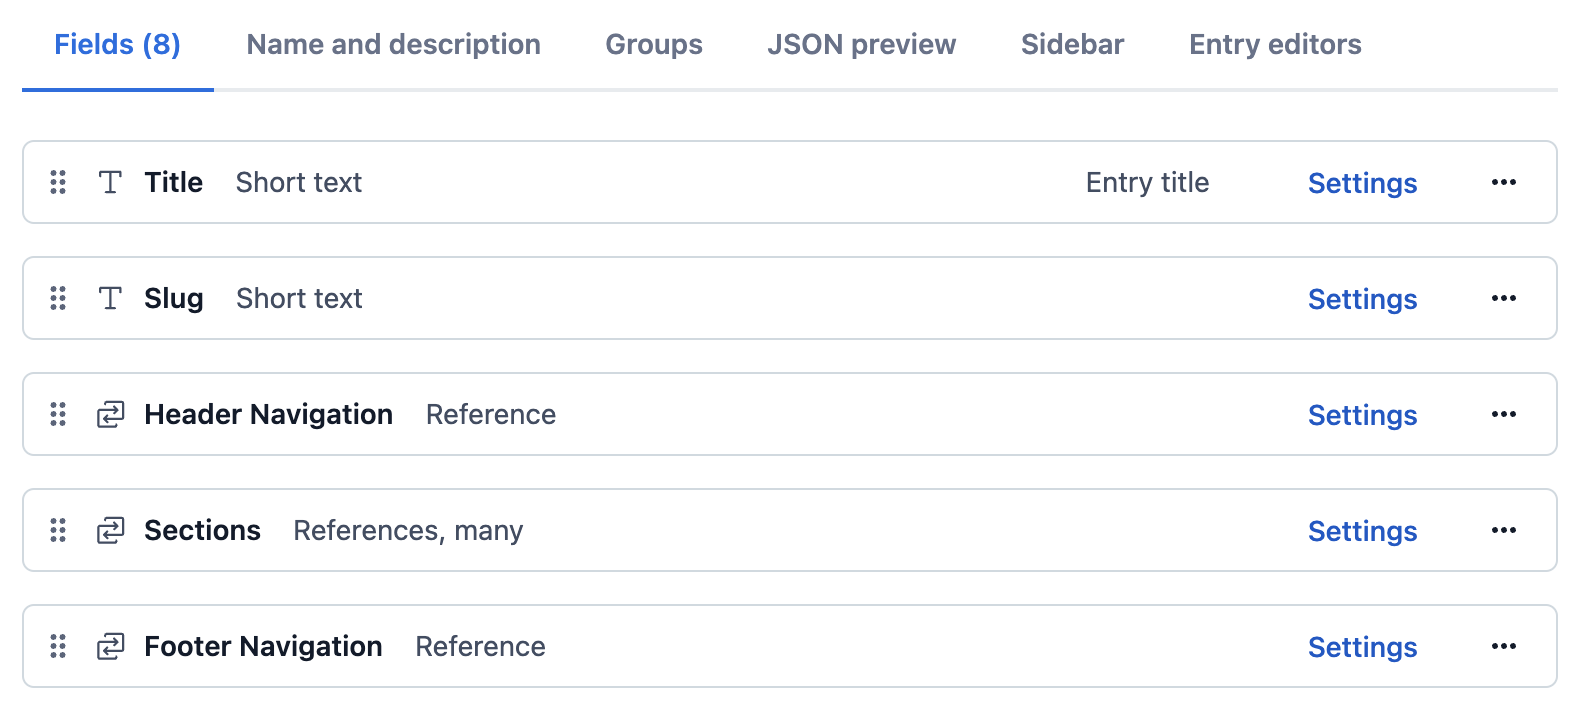
The self-service page needs to be its own content type. The fields for our content type were a title for internal use, the slug of the webpage ([baseUrl]/[slug]), and a multi-reference field we named “Sections”. Every Contentful type needs an entry title to be able to identify it from other entries, so in this case the “title” field isn't queried or used by our code as it's only for internal Contentful use.
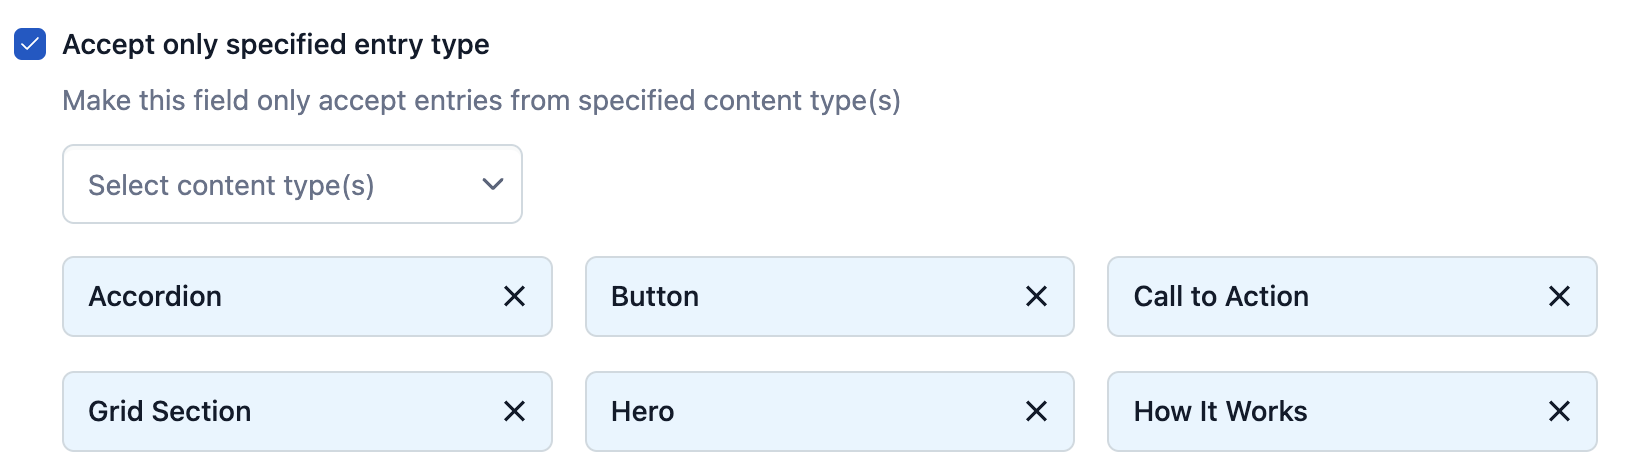
When creating or editing the field, you'll update the validation section to “accept only specified entry types” with a list that includes any of the content models you created in the previous step that you want to be used when building a self-service page. When you create your self-service page content, you can add as many individual components of these specified types as you need to build your page.
## Step 3: Create your components
This is where things get more technical and specific to Gatsby. Each entry type that you've chosen to be selectable as a section in your self-service page should be a component with a GraphQL query fragment. As an example, here is some simplified code from our “CTA” component that queries the fields in the “Call to Action” entry type in Contentful.
-- CODE line-numbers language-jsx --
<!--
import { graphql } from 'gatsby'
import { Box } from '@material-ui/core'
const CTA = ({
eyebrow,
body,
buttons,
backgroundImage,
}) => {
return (
<Box>
{...}
</Box>
)
}
export default CTA
export const query = graphql`
fragment CallToAction on ContentfulCallToAction {
eyebrow
backgroundImage {
file {
url
}
}
body {
raw
}
buttons {
type: __typename
... on ContentfulButton {
...Button
}
}
}
`
-->
We named the GraphQL fragment `CallToAction` which will be important for the next step.
## Step 4: Create the self-service page template
The React component to render your pages is fairly simple. At this point, we're assuming you've already written the rest of the React code for each individual section; those heroes, carousels, and informational grids we talked about in step 1.
Create a file in your `/templates` folder (we've named ours `self-service-page.js`). This is the file that will control rendering the self-service pages.
### The file will contain four main parts:
- your imports
- a components object
- the jsx to render
- your GraphQL query
We'll walk through these parts of the code as you would build them.
First, you want to start with your self-service page query. Filter by the slug of the self-service page entry and include your queries for the other fields that are part of your self-service page model.
As you built your individual Section components, you were writing your GraphQL fragment queries which should be used here. Note the `CallToAction` fragment that we created in step 3 being referenced at the bottom of the query below. For your self-service page query, you'll want to include the fragment for every component you allow to be used as a Section in your self-service page model.
-- CODE line-numbers language-jsx --
<!--
export const pageQuery = graphql`
query sspQuery($slug: String!) {
contentfulSelfServicePage(slug: { eq: $slug }) {
sections {
type: __typename
... on ContentfulHero {
...Hero
}
... on ContentfulAccordion {
...Accordion
}
... on ContentfulGridSection {
...GridSection
}
... on ContentfulTestimonialCarousel {
...TestimonialCarousel
}
... on ContentfulCallToAction {
...CallToAction
}
}
}
}
`
-->
Of particular importance is the query of the `__typename` of the section, which we rename to `type` for readability. This should return the Contentful typename of the content in your Section field (e.g. `ContentfulHero` or `ContentfulInformationGrid`). This is how we will determine which component to render.
Log the output of your query via the component props (destructured as `data`) to confirm you’ve set everything up correctly. You should look for the `sections` array that’s a few levels into the data object.
-- CODE line-numbers language-jsx --
<!--
// imports
const SelfServicePage = ({ data }) => {
const {
contentfulSelfServicePage: { sections, ...rest },
} = data
// ...
}
// query
-->
Next, we will create a simple object that maps our React components with the Contentful identifier `type` we queried for. Import all the components you've created for your self-service pages, and populate the object with the keys as the Contentful types and the values as the component reference.
-- CODE line-numbers language-jsx --
<!--
// imports
import CTA from '../components/CTA'
const SelfServicePage = ({ data }) => {
const {
contentfulSelfServicePage: { sections, ...rest },
} = data
const components = {
ContentfulHero: Hero,
ContentfulAccordion: Accordion,
ContentfulGridSection: GridSection,
ContentfulTestimonialCarousel: TestimonialCarousel,
ContentfulCallToAction: CTA,
}
// ...
}
// query
-->
The last step is as simple as using `map()` to loop through all of the sections and render the components from the object you've just created in the return statement of the JSX component. Within the callback of your `map()` call, you'll create a general Component const that is assigned the value of the React component that matches the type of the current section. You'll return this Component, which will be rendered as part of this template page.
-- CODE line-numbers language-jsx --
<!--
// imports
import CTA from '../components/CTA'
const SelfServicePage = ({ data }) => {
const {
contentfulSelfServicePage: { sections, ...rest },
} = data
const components = {
ContentfulHero: Hero,
ContentfulAccordion: Accordion,
ContentfulGridSection: GridSection,
ContentfulTestimonialCarousel: TestimonialCarousel,
ContentfulCallToAction: CTA,
}
return (
<Layout>
<Box>
{sections?.map(({ type, ...rest }, id) => {
const Component = components[type]
if (Component) {
return <Component key={type + id} {...rest} />
}
})}
</Box>
</Layout>
)
}
// query
-->
## Step 5: Use Gatsby to create all of your pages
Finally, if you're using Gatsby, you'll want to use `createPage()` in your `gatsby-node.js` file for every self-service page you publish in Contentful. Here's a basic example of what that code could look like. We're querying all of our “self-service page” entries and creating a unique page for each entry based on the slug field.
-- CODE line-numbers language-jsx --
<!--
const path = require("path")
const slash = require("slash")
exports.createPages = ({ graphql, actions }) => {
const { createPage } = actions
const sspTemplate = path.resolve(`./src/templates/self-service-page.js`) // path to your template file
return graphql(`
{
ssps: allContentfulSelfServicePage {
nodes {
slug
}
}
}
`)
.then(({ data }) => {
const { ssps } = data
ssps.nodes.forEach(({ slug }) => {
createPage({
path: slug === "index" ? "/" : `/${slug}`,
component: slash(sspTemplate),
context: {
slug,
},
})
})
})
.catch((error) => {
console.log("Error retrieving Contentful data", error)
})
}
-->
If done correctly, all of the sections you've added to any particular page should render when you visit the slug of the page in your browser.
### If you're having issues at this point, try the following:
- Double check that your content is published
- Try querying for a single page with the fragment at the beginning of step 4 using graphiql
- Log out the data the queries are returning in your components / the self-service template
From here, you can add more utility to the template page by adding a header and footer that render for every page across the site or any other component that you wish to be shared by all of your self-service pages.
Now that everything is set up, adding new pages should be pretty simple! Your content editors can mix and match different components that differ in copy and content to make brand new pages for your site. If they want a new section added to a new or existing page, your developer can design that component in isolation until it's ready!
## Final thoughts
Creating a self-service page pattern with Contentful can be a straightforward and effective way to provide your website content editors with the tools they need to build new pages with reduced developer investment.