Most applications of the OpenAI API are basically a slimmed down version of ChatGPT.
Vercel even has hooks to make this easy to implement. But what about images?
In this tutorial we’ll be building a Next JS app that takes a user uploaded image and describes its contents back to us.
Setup
To start, you’ll need to sign up for an Open AI account if you haven’t already. From there you’ll need to create a new api key here. Copy this code off somewhere, we will be using it soon.
At the time of this post the model we need is only available to paid users, but you can prepay as little as $1 to gain access. Here is more information about limitations and how to prepay for vision access.
Once you’ve created an account, we can set up our Next JS app using the cli:
npx create-next-appAll of the defaults are fine for this project. Next we’ll want to install a few libraries to help us work with the Open AI API:
npm i ai openaiNow, create a new file named env.local at the root of your project and add the following:
OPENAI_API_KEY=the key you created earlierCall the Open AI API
Now we’re ready to write some code. Let’s start with the Open AI call. Inside the `app` folder create a directory called `lib` and then create a file called `classifier.ts.` This is where the logic for classifying our images will go.
import { OpenAI } from "openai";

import { OpenAIStream } from "ai";


// create a new OpenAI client using our key from earlier

const openAi = new OpenAI({ apiKey: process.env.OPENAI_API_KEY });


export const classifyImage = async (file: File) => {

  // encode our file as a base64 string so it can be sent in an HTTP request

  const encoded = await file

    .arrayBuffer()

    .then((buffer) => Buffer.from(buffer).toString("base64"));


  // create an OpenAI request with a prompt

  const completion = await openAi.chat.completions.create({

    model: "gpt-4-vision-preview",

    messages: [

      {

        role: "user",

        content: [

          {

            type: "text",

            text: "Describe this image as if you were David Attenborough. Provide as much detail as possible.",

          },

          {

            type: "image_url",

            image_url: {

              url: `data:image/jpeg;base64,${encoded}`,

            },

          },

        ],

      },

    ],

    stream: true,

    max_tokens: 1000,

  });


  // stream the response

  return OpenAIStream(completion);

};
There is a lot of code here, so let’s break it down a little.
export const classifyImage = async (file: File) => {

  const encoded = await file

    .arrayBuffer()

    .then((buffer) => Buffer.from(buffer).toString("base64"));
Here we can see our function is taking in a file and then encoding it into a base64 string. This makes it possible for us to send it in an HTTP request, which we’ll need in order to get it over to Open AI.
const completion = await openAi.chat.completions.create({

  model: "gpt-4-vision-preview",

  messages: [

    {

      role: "user",

      content: [

        {

          type: "text",

          text: "Describe this image as if you were David Attenborough. Provide as much detail as possible.",

        },

        {

          type: "image_url",

          image_url: {

            url: `data:image/jpeg;base64,${encoded}`,

          },

        },

      ],

    },

  ],

  stream: true,

  max_tokens: 1000,

});
This is using the Open AI npm module to generate a completion, which is an object used to represent a request to Open AI. The messages array are where we tell the AI what we need it to do.
In this case we’ve told it to describe an image, and provided the base64 encoded string earlier as our image data. We’ve also set stream to true because we want to replicate Chat-GPT’s response pattern of writing text as it comes in since this request will take awhile, and we want to have as good of a user experience as possible. We also set a max_tokens value as a sort of sanity check to make sure our request doesn’t get too expensive (both computationally and on your wallet).
return OpenAIStream(completion);To complete the function we call Vercel AI’s OpenAIStream function, which takes a completion and handles streaming the response.
Create an API endpoint
In order to actually call this route with a file, we’re going to create an API route. This will make it callable from one of our client components via a `fetch` call. To do that we need to create an `app/api/classify` directory, then create a `route.ts` file so Next JS’s file based routing will pick it up. After you’ve created the file paste the following code in:
import { classifyImage } from "@/app/lib/classifier";

    import { NextResponse, NextRequest } from "next/server";

    import { StreamingTextResponse } from "ai";


    // Set the runtime to edge for best performance

    export const runtime = "edge";


    // add a listener to POST requests

    export async function POST(request: NextRequest) {

      // read our file from request data

      const data = await request.formData();

      const file: File | null = data.get("file") as unknown as File;


      if (!file) {

        return NextResponse.json(

          { message: "File not present in body" },

          { status: 400, statusText: "Bad Request" }

        );

      }


      //call our classify function and stream to the client

      const response = await classifyImage(file);

      return new StreamingTextResponse(response);

}
Let’s take a closer look at what we’re doing here:
export async function POSTThis tells Next to register a POST route at /api/classify.
const data = await request.formData();

  const file: File | null = data.get("file") as unknown as File;


  if (!file) {

    return NextResponse.json(

      { message: "File not present in body" },

      { status: 400, statusText: "Bad Request" }

    );

  }


const response = await classifyImageStream(file);

return new StreamingTextResponse(response);
Here we’re getting a file from the form data sent along with the POST request and doing some validation to make sure it’s present. If the file is there we send it along to the function we created earlier. We lean on another tool from Vercel’s ai package to send the response back as a stream.
Create an upload component
Now that we’ve got our server side implementation wrapped up and have an endpoint, we need to create a mechanism to call it. We’ll create an `ImageClassifier` component to do this. Create a `ui` folder inside the `app` folder and add a new file named `imageClassifier.tsx` in it. Paste the following code inside:
"use client";
import { useState, FormEvent } from "react";
export default function ImageClassifier() {
// set up some variables to help manage component state
const [file, setFile] = useState<File | null>(null);
const [image, setImage] = useState<string | null>(null);
const [response, setResponse] = useState("");
const [submitted, setSubmitted] = useState(false);
const [inputKey, setInputKey] = useState(new Date().toString());
const onSubmit = async (e: FormEvent<HTMLFormElement>) => {
e.preventDefault();
setSubmitted(true);
// prepare and submit our form
const formData = new FormData();
formData.append("file", file as File);
fetch("/api/classifystream", {
method: "POST",
body: formData,
}).then((res) => {
// create a stream from the response
const reader = res.body?.getReader();
return new ReadableStream({
start(controller) {
return pump();
function pump(): any {
return reader?.read().then(({ done, value }) => {
// no more data - exit our loop
if (done) {
controller.close();
return;
}
controller.enqueue(value);
// decode the current chunk and append to our response value
const decoded = new TextDecoder("utf-8").decode(value);
setResponse((prev) => `${prev}${decoded}`);
return pump();
});
}
},
});
});
};
// resets the form so we can upload more images
const onReset = () => {
setFile(null);
setImage(null);
setResponse("");
setSubmitted(false);
setInputKey(new Date().toString());
};
return (
<div className="max-w-4xl">
{image ? (
<img
src={image}
alt="An image to classify"
className="mb-8 w-full object-contain"
/>
) : null}
<form onSubmit={onSubmit}>
<input
key={inputKey}
type="file"
accept="image/jpeg"
onChange={(e) => {
// sets or clears our image and file variables
if (e.target.files?.length) {
setFile(e.target?.files[0]);
setImage(URL.createObjectURL(e.target?.files[0]));
} else {
setFile(null);
setImage(null);
}
}}
/>
<p className="py-8 text-slate-800">
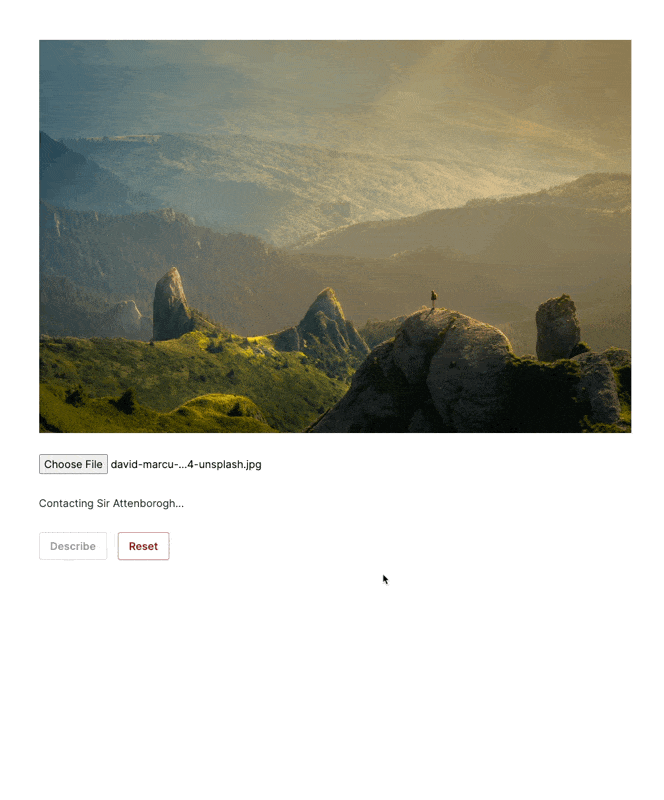
{submitted && !response ? "Contacting Sir Attenborogh..." : response}
</p>
<div className="flex flex-row">
<button
className={`${
submitted || !file ? "opacity-50" : "hover:bg-gray-100"
} bg-white mr-4 text-slate-800 font-semibold py-2 px-4 border border-gray-400 rounded shadow`}
type="submit"
disabled={submitted || !file}
>
Describe
</button>
<button
className="bg-white hover:bg-red-100 text-red-800 font-semibold py-2 px-4 border border-red-400 rounded shadow"
type="button"
onClick={onReset}
>
Reset
</button>
</div>
</form>
</div>
);
}This is our most complex piece of code yet, so let’s break it down:
"use client"This tells Next JS we’re using a client component, which will let us use state hooks as well as tell Next JS to not render this component on the server.
const [file, setFile] = useState<File | null>(null);

const [image, setImage] = useState<string | null>(null);

const [response, setResponse] = useState("");

const [submitted, setSubmitted] = useState(false);

const [inputKey, setInputKey] = useState(new Date().toString());
We have a lot of state to look after here. `file` is the file we’re going to eventually be sending to the server, `image` is that file represented as an Object URL for display. `response` will be used to capture our response from the server.
We need to store this as a state variable because it will be coming back in chunks as a streaming response. `submitted` is used as a helper to disable form elements and show loading state, and `inputKey` is used as way to force React to clear out our input when we reset our form.
Most of the rest of the component is markup, but there are two functions that deserve a closer look (`onReset` simply resets our form values so we will skip that one).
<input

  key={inputKey}

  type="file"

  accept="image/jpeg"

  onChange={(e) => {

    if (e.target.files?.length) {

      setFile(e.target?.files[0]);

      setImage(URL.createObjectURL(e.target?.files[0]));

    } else {

      setFile(null);

      setImage(null);

    }

  }}

/>
The `onChange` function checks if a file was selected, and if it was stores it in state as well as converts it to an ObjectUrl to show a preview to the user.
`onSubmit` is where the file is handled and passed off to the server. If we were only dealing with text, we could leverage Vercel’s [useChat](https://sdk.vercel.ai/docs/api-reference/use-chat) hook and abstract most of this complexity away, but since we’re dealing with binary data we will stream it ourselves. First we get our data ready to submit and send it to our server using `fetch`:
const formData = new FormData();

formData.append("file", file as File);

fetch("/api/classify", {

  method: "POST",

  body: formData,

}).then((res) => {
Next we handle streaming:
const reader = res.body?.getReader();

return new ReadableStream({

  start(controller) {

    return pump();

    function pump(): any {

      return reader?.read().then(({ done, value }) => {

        if (done) {

          controller.close();

          return;

        }

        controller.enqueue(value);

        const decoded = new TextDecoder("utf-8").decode(value);

        setResponse((prev) => `${prev}${decoded}`);

        return pump();

      });

    }

  },

});
We take advantage of `fetch`'s stream implementation and create a `ReadableStream` to take in data as it comes in. To read the stream as it comes in we create a `pump` function and call it every time we receive a value from our stream until it’s done. We then take the value and append it to our response, giving us the same sort of effect you see with ChatGPT.
Wrapping up
Our last step is to render our `ImageClassifier` component on a page. Open `app/page.tsx` and replace its’ contents with the following:
import ImageClassifier from "./ui/imageClassifier";


export default async function Home() {

  return (

    <main className="flex min-h-screen flex-col items-center p-24">

      <ImageClassifier />

    </main>

  );

}
To test our app we can run `npm run dev` and head to http://localhost:3000.
Voila! We now have a functioning app that takes an image and describes it.
Though the example was a little silly there are quite a few interesting applications we could apply by adjusting the prompt. Also, since we’re exposing an API endpoint you could call it with another client, like a mobile app for example.
Interesting in learning more about the tools we used?
Here are some resources to help you get started
You can find a slightly modified version of the source code here. In this version you can see a non-streaming API route as well and how they are different. Thanks for reading and happy coding!